

Here’s a pleasant surprise from my 2020 teaching online experience – I’ve really enjoyed lessons that focus on collaborative writing. More importantly, I think my learners have. This post will diverge a little from the format we normally use here. It’s a three-parter focusing on:
- a brief discussion regarding if or why we should bother with writing in class;
- a general, transferrable procedure for collaborative online writing;
- a sample lesson that applies this procedure, complete with materials / links to support it. If they seem useful, you can copy and adapt them for your own online writing lessons.
Skip or skip ahead as suits your interests and busy schedule.
Overall, I hope the main takeaway is how simple tools such as Google Jamboard and Google Docs can enrich a focus on this skill, whether before writing (e.g. generating ideas) during writing (e.g. live monitoring and feedback) or after writing (e.g. encouraging focused self- and peer assessment).
1. Why bother with writing in class?
Writing has long been regarded as the neglected skill, particularly in general English classes; this despite our awareness that such neglect can prove problematic when learners reach B2 / C1 level, at which point they are suddenly required to demonstrate their writing skills in high-stakes exams and in order to succeed in tertiary education.
There are various reasons for this neglect, but one common view held by learners and teachers (my younger self included) is that writing is a waste of classroom time, time that should be spent engaging learners in oral communication with each other. This view holds that writing is a solitary – and possibly boring – endeavour, fit only for homework / asynchronous work. I think differently now: I believe that when you engage learners collaboratively in the writing process, there is genuine potential for communicative, motivating and meaningful work in a lesson. More specifically, I believe that collaborative and process-oriented writing:
- can lead to a varied, integrated lesson (writing may be the end-product, but speaking and listening – communication – are fundamental to the process);
- can have a positive impact on group cohesion and dynamics;
- is task-based – the end-focus of the lesson is not replication of specific forms but co-creation of text expressing the meaning students wish to express;
- is potentially rich in affordances, chances to provide specific emergent input at the point of need;
- facilitates autonomy by allowing for self- and peer assessment.
I believe that this true for both face-to-face and online lessons; in particular, Google Docs and Jamboard are tools that work wonderfully well to support collaborative writing.
2. A General Procedure for Online Collaborative Writing

It is well-established that writing is a complex and recursive process rather than a linear one; a skilled writer moves back and forth through generating content, selecting content, organising it, drafting, editing, re-drafting, re-editing and so on. In the classroom, we tend to think of the writing process more in terms pre-writing / while writing / post-writing. This is a simplification yet it is a pedagogically convenient way to approach staging it in class. Below I suggest around eight main steps taking students through the planning and drafting process:
- Pre-Writing 1 – Establish the Context. Set the context of the writing, building interest in it, using standard techniques e.g. visuals, clips, personalised discussion, opinions, anecdotes. In the example below, I use an excerpt from an authentic advert pasted onto Jamboard as well as a Youtube clip.
- Pre-Writing 2: Generate and Select Content. This can be done by adding sticky notes to Jamboard based on prompts e.g. listing, brainstorming, debating, ranking. Students can be given a stimulus related to the writing and a clear goal e.g. in groups agree on 5 pros and 5 cons of tourism in your city . After this, the students (either whole class or still in groups) can agree on a more limited number of the best ideas they use as a basis for their texts: they whittle and select. They should “move” these best ideas from Jamboard to a central Google Doc for the class. See the example below, Central Google Doc Ex A.
- Pre-Writing 3: (optional) Model Text. Provide a sample of the writing you want the learners to work towards. I feel it’s worth being cautious here, judiciously using a model to support the writing rather than suggesting what is provided should be imitated. The danger of a sample in a creative, meaning-focused writing lesson is that learners may feel they ought to replicate the language used in the model at the expense of expressing their own ideas; that is to say, a focus on forms rather than a focus on form can result (whether you feel this is an issue will depend on various factors best discussed elsewhere). If you feel learners can create a text without a model, consider leaving it out.
- While Writing 1: Settling In. I would first ensure students are in the right place: that they are in a Room with 2 or 3 peers, and that they have found and opened their Room’s Doc to work within (see the example lesson below for a concrete description of this). Double check the goal / purpose / audience of the writing is clear Double check they know others will in the end read their work (this may encourage them to pay a bit more attention to accuracy and polish).
- While Writing 2: Monitoring Student Output. It’s hard to overstate how important this role, the “online feedback provider” is. I favour two approaches: 1) direct monitoring of student writing through the rooms, making suggestions orally as they write; 2) responding directly in written form on the docs, adding comments, questions and highlighting issues as they write. I find a combination of both to be valuable. As noted earlier, there is real scope here to deal with emergent issues and help the learners with the language they need to express what they want – experiment with the best way to make yourself available to do so.

- Post-Writing 1: Self-assessment. Students can evaluate their own work, using for instance a checklist (see below for a better example than the one in the image above). You can build in time for this once they complete the writing, asking the group to check whether they have included what they need to, and giving them time to do any last-minute editing.
- Post-Writing 2: Peer Assessment. Give students the opportunity to move from Doc to Doc (remember, the links are all on the Central Google Doc). Ask them to add comments related to content (i.e. content feedback): if the communicative purpose is fulfilled, reader informed etc; what they particularly enjoyed about their peers’ writing. Ask them to add comments related to language (i.e. language feedback), using the checklist or anything else they spot. This isn’t just correction: they can praise and plunder useful phrases from each other.
- Post-Writing 3: Final Feedback. As a whole class, address any useful points from the two steps above. You can also find out how they felt about the different steps (i.e. process feedback): what was more challenging, what they feel more confident about.
3. A Sample Lesson: Santa’s “Magical” Drive Thru Adventure
This lesson was inspired by an odd cultural phenomenon that may be unique to the UK (please correct me if I’m wrong) – “Winter Wonderland” events that promise much (modelled as they are on the extravagant original ones from the US) but spectacularly underdeliver. In the news recently there was one such example: a safe, socially distanced “Drive Thru” Wonderland that left the customers distinctly unimpressed due to its poor organisation and corner-cutting. In this lesson, learners find out more about the context of such events, collaborate to imagine what could / did go wrong, and write an email of complaint in order to obtain appropriate compensation.
Materials:
Jamboard for the pre-writing stages
Central Google Doc for the writing and post-writing stages (including links to Room docs)
Note that these are all set to Anyone on the internet can view – if you’d like to use and adapt them, feel free, but keep in mind you will need to make a copy first (please don’t write asking for access – just make a copy!). Once you have done so, you can edit the document as you wish and adjust the access settings so students can edit (i.e. write within) the document.
- Pre-Writing 1 – Establish the Context. Ask learners if they can think of some typical Xmas entertainment in their own or other countries, as relevant e.g. Xmas markets, Xmas fairs, Santa’s Grotto etc. Ask them if they know what a “Drive Thru” Wonderland experience is. Show a clip of one in action e.g. 4.50 – 5.20 here. You could ask: would you enjoy it? Would younger children enjoy it? Find out if they think these events are a good idea in general (in my experience this draws mixed views including thoughts on the brash commercialism of Xmas). Share your screen again, showing frame 1 of the Jamboard link: tell them this is one such event happening in England this year. Ask them to quickly read the website information in frame 2. Their task is to pick out 3 or 4 “experiences” children / families can have. After they have done so, ask again if it seems appealing and why / why not. Wrap up this stage with frame 3, bridging to the next by asking what could go wrong? Elicit one or two ideas (e.g. students have suggested to me that the customers caught covid – thankfully this is not the case!).
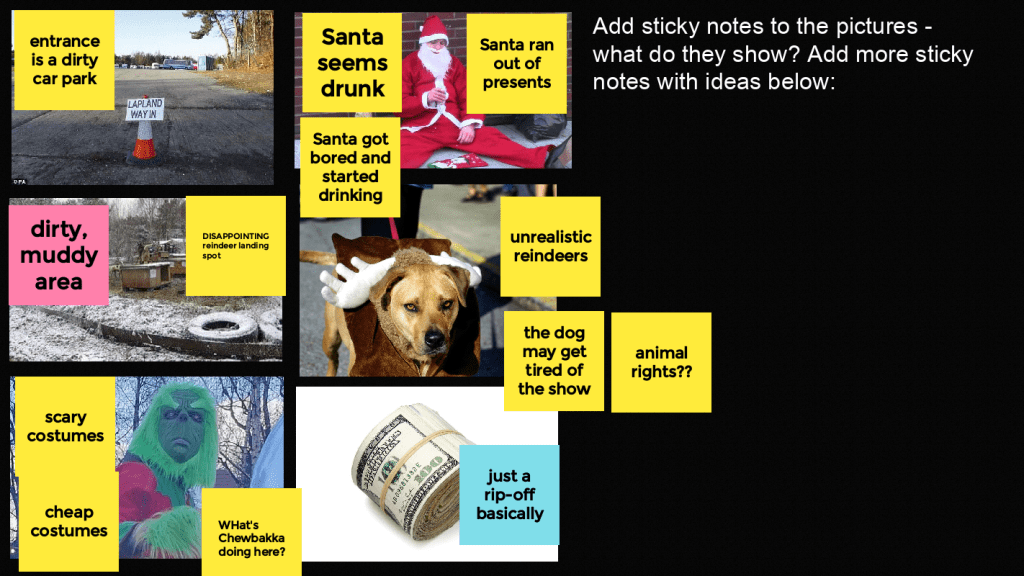
- Pre-Writing 2: Generate and Select Content. Move to Jamboard frame 4. Tell students these are the things that can go wrong (legal note: these are a composite of things that have gone wrong in such events; they are not all are true of the particular event from frame 1/2 – though the terrifying Grinch pic is). Ask students to add sticky notes to each picture indicating what it shows. Do a demonstration e.g. the reindeer was a sad dog. Students in groups should then add sticky notes to all pics, as well as adding up to 5 more ideas in the space to the right. Once they have finished, allow students to evaluate the ideas and agree on the 4-6 best. Transfer these to the Central Google Doc (Ex A).
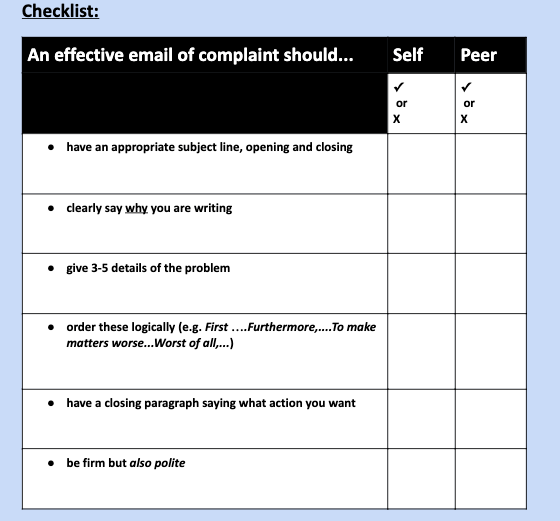
- Pre-Writing 3: Model Text. Ask students how they think parents and children felt after a disappointing event such as this. Show Frame 5; students should read it and identify how the father feels and how they know this (furious, bad language, tone, CAPS!). Use some guiding questions to establish the function of an email of complaint: what does the father want? (his money back). Will he get it back? (highly unlikely). Why not? (because of his tone). Now ask the students for ideas regarding how to improve this email of complaint, adding sticky notes to the Frame e.g. don’t be angry; use Dear Sir or Madam. Ask guiding questions along the lines of the checklist in the Central Google Doc (Ex B). When ready, draw attention to this checklist, checking they understand the points / features. If you haven’t already made it clear, set the goal of the task: to work together to write an effective email that a) outlines the problems with the event b) makes it clear what they want back (you might feed in e.g. to ask for a refund, to receive compensation).
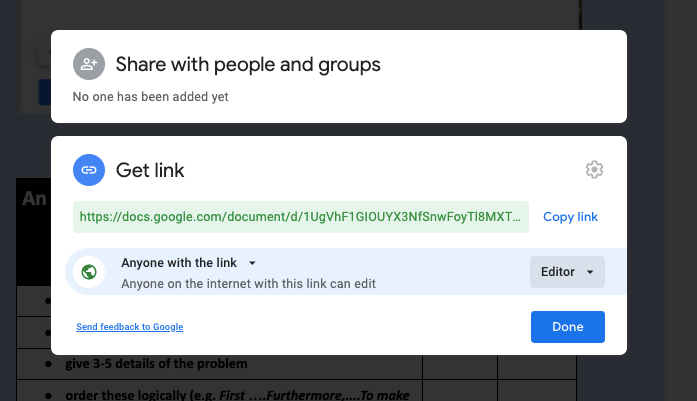
- While Writing 1: Settling In. The Central Google Doc should have links named e.g. Room 1, Room 2, Room 3, corresponding to the breakout rooms students are working in. When you create these, make sure you click the blue Share button in the top right of the Google Doc and then set access to the option that Anyone on the internet with this link can edit (see the image above). Paste the link into the Central Google Doc; highlight it; click the Insert Link icon to make the URL a direct clickable link. For one final step, select the whole URL and you’ll see an option to rename it according the title of the document. Click this. Repeat with however many rooms / docs you need (if this seems fiddly, it’s not as bad as it sounds! A more detailed explanation can be found here).
- While Writing 2: Monitoring Student Output. When you have been in the breakout rooms once, and are satisfied students are on task and can work fairly independently, take more of a backseat. Click through the different docs (e.g. Room 1, Room 2), read their emergent work, and add comments. You can do this by highlight something the students have written; you then have the option to add a qualitative comment. These can be a combination of praise (“very clear start!”), prompts for self-correction (“this is a bit informal. Can you say it more formally?”, “check the spelling”, “should this be past or present?”), extra input (“good; another way to say this is….”) or reminders regarding the content / goal (“don’t forget to ask for compensation”). Every few minutes, go into the rooms to see if the students have any questions for you (they can also ask these via comments).
- Post-Writing 1: Self-assessment. Once a group finishes, and addresses all of your comments, ask them to double check their writing using the checklist above the template they have been writing in.
- Post-Writing 2: Peer Assessment. Give students the opportunity to read their peers’ work. Ask them to add comments related to content (i.e. content feedback): if they think they will receive compensation and why / why not. Ask them to add comments related to language (i.e. language feedback), using the checklist or anything else they spot. Tell them they can “steal” phrases and sentences they enjoyed in their peers’ work.
- Post-Writing 3: Final Feedback.As a whole class, address any useful points from the two steps above. You can make a list of phrases / sentences from the writing in the Central Doc (Ex D), for instance, mixing correct and incorrect examples, and asking the learners to correct the incorrect ones.
Variations and Extension
- It’s Christmassss!!: do you fancy doing some seasonal writing in the next week while not focusing on a disappointing Xmas drive-thru? Adapt the above to any other possible Xmas-related writing genre e.g. wish-lists, letters to Santa, applications for a Xmas-related role (e.g. Santa in the Grotto), essays on the pros and cons of Xmas etc or…
- Not Christmas: …have you learners write up descriptions / evaluations of another significant festival or period.
- Level, need, genre: as noted, the procedure is flexible – it can be tweaked for different genres at different levels in different contexts. Adjust time and support spent on pre-writing, while-writing etc. as appropriate. Also:
- Model or not? This is a tough call. My personal inclination in online collaborative writing is to minimise this. On the other hand, if you are working with a genre that learners need to “get right” – for instance, an essay for exams – then you could consider the whole procedure above to be the first draft – you can provide samples later as necessary for students to use as a source of input when redrafting.
- Redrafting: while the above focused on collaborative writing, the redrafting could be done for homework, even under timed conditions in the case of learners who will be required to do so (e.g. exam students).

Pingback: 15 Christmas lesson plans! – The TEFL Zone
Pingback: Taking Task-Based Learning Online – Fluency First ELT