


On 28th February I had the pleasure of participating in the Trendy Teachers Online Conference. The focus of my talk was doing tasks online with teenagers. It will come as no surprise that Jamboard featured heavily. I continue to find it a great blend of user-friendliness and flexibility when it comes to scaffolding and focusing online communication. Here I’d like to share the 5 tasks I looked at, with links to the Jamboard and brief descriptions of the procedure for each task. I’ll start with some general tips that you may well know but in my experience are not yet widely known by everyone who is starting to use Jamboard. The tasks are a mix of “classics” (as in, they’ve been around for even longer than I’ve been teaching…) and new ones I devised recently. I don’t think they are only suitable for teenagers
Here are links to the tasks if you want to jump straight to one:
- Secret Hobbies
- Post-Pandemic Travel
- Zootopia / Holiday Village
- Lord of the Flies
- Picture Story: The Big Leak
Jamboard Essentials
Here’s the link to the Jamboard for these tasks. A few points about this and using Jamboard in general:
- I’ve mentioned this a couple of times in previous lessons but I think it’s counterintuitive so I’ll repeat it – the Jamboard is not set to Anyone with the link can edit. Why not? Because if it was, as soon as you edit, the changes would apply to anyone with the link. So consider it to be by default an unalterable template. Make your own copy by going to More Options – the three dots next to Share in the top right corner – and selecting Make a copy. It will now be saved in your Google Drive and will be yours to tinker with to your heart’s content.
- Related to this: if you want students to interact with your Jamboard (which is really a significant part of its functionality), set the Share function to Anyone on the internet with this link can edit or set it to Restricted and invite your students in via their email addresses. Keep in mind, though, that as soon as others having editing rights, there is potential for your Jamboard to become something very different by the end of the lesson; if you want to re-use it make a copy for yourself, as your own template, before the lesson. (Side note: a current weakness of Jamboard is the lack of functionality for properly sorting and storing Jamboards effectively – if like me you now have dozens in your drive, the basic search functions aren’t really optimal. Give us the option to store them in folders, please, Google!).
- If you only want the frames for a single lesson e.g. Secret Hobbies, make a copy and delete the rest of the frames. I’m not aware of a smoother way to do this yet (e.g. being able to import frames into other Jamboards would also be a useful function, Google).
- Within a given Jamboard, decide how many duplicates of the frame you need for the lesson: you may need, for instance, one for a demonstration / instructions (see Secret Hobbies directly below) and then one for each student or group, depending on the interaction. To do this, click Expand Frame Bar in the top middle of the screen, and then click the three dots, then duplicate. Note you can drag the frames left and right to order them as you wish. Although each frame is labelled, I think it is helpful to name them (by putting a name into a text box and putting this near the top of the frame); it makes sense for frame names to correspond to room names in Zoom (so: Room 1 is asked to work on the frame named Room 1 etc.).
On to the tasks – I hope you find something useful here!
1. Secret Hobbies

(frames 1 / 2)
Students select a hobby they have that the other learners don’t know about, then prepare and give a presentation about it, with distractors, without saying what the hobby is. The others in the group have to try to guess it. If there are “no secrets” between the learners, the hobby can be made up (have a list ready for the students)
- Lead in by brainstorming / listing / pooling more typical and less typical hobbies. Ask if there are any hobbies from the list they would be interested in trying.
- Ask learners to think of a hobby they have, had or would like to have that the others in the class do not know about. In case this is difficult e.g. learners know each other very well have some hobbies “up your sleeve” e.g. urban exploration, live action role-playing, stamp collecting, potholing / spelunking, breeding gerbils etc.
- Tell them they will give a short (30 seconds to 2 minutes, depending on level etc.) presentation of their hobby to others in a group. BUT: they shouldn’t say what it is, the others have to guess. And they should not make it very obvious from early on.
- Demo: show frame 1 (this should be adapted to be your secret hobby). Talk through the instructions, using the laser (from the panel on the left of Jamboard) to highlight them as you talk through. Ask them to discuss what they can see in the pictures in the table on the bottom right. Do these help give any clues?
- Tell the students about your hobby – it’s easier if you script or make notes beforehand: remember not to give it away, to plant distractors, but to give increasingly obvious clues as your talk goes on e.g. (graded here for B2): I’ve been doing this for about 20 years, there’s just something so pleasing about collecting these beautiful things, and it gives me a real kick when I find one from a new country. I have about 30 or 40 right now, but part of the hobby is buying them and then selling them on later. The thing about them is that they’re not only gorgeous to look at, and to touch, but to listen to as well. There’s nothing quite like looking down and realising you have so much music at your feet. It’s magical. I can make so many different sounds with them using the same guitar. I just wish some of them didn’t need to use batteries as, obviously, that is terrible for the environment. Ask students to recall the clues in rooms and to agree on a guess. (The answer here is stomp boxes i.e. guitar effect pedals).
- Remind students they will now prepare to do the same. Check the parameters of the task e.g. if they should say what the hobby is, if they should give more clues earlier or later. Draw attention to the pictures: they should find 3-5 pictures to support the presentation but these should not be obvious and indeed can be distractors.
- Students prepare their presentation – if it is in class, be ready to help them with language they need (either put individuals in rooms, if feasible, or ask them to contact you via the chat; if it is easier this prep stage could be for homework with the task resuming next time – I have a preference for it all being in the same lesson.
- Put them into groups, and ask them to take turns to a) present their hobby b) guess by writing in the chat and sharing it at the end of the presentation c) discussing the clues that helped or indeed didn’t help. Monitor rooms to note language for feedback.
- Students could write up descriptions of their hobbies for homework.
2. Post-Pandemic Travel

(frames 3 / 4)
This task involves a positive take on the near future: that we can now easily and safely travel to different destinations. Students look at a long list of options, narrow it down, and then allocate the remaining choices, researching them in terms of various criteria before presenting these findings and voting as a class for the best choice. Important note: this task is based on evaluating destinations that may be attractive but your students aren’t very familiar with, so select / adapt / choose accordingly. Each should have their own merits and potential downsides; if you choose an obviously more attractive destination then there is less need / motivation to research, share findings, debate etc.
- Show students the destinations on frame 3 – ask them to match the picture with the place, dragging the sticky note so it is next to its respective location. Keep in mind the advice above and adapt / select destinations that are suitable for your learners, finding a picture for each destination and putting it on the Jamboard.
- Tell students the pandemic is over or has significantly receded, international travel is much easier, and these are possible destinations they can visit as a group this summer / winter / in the next few months (as appropriate). The long list is 6 destinations – they should now agree to reduce this to 3 or 4. This can be done whole class, or in breakout rooms (BORs) and then agreed in feedback. There are no strict criteria for this – just based on intuition / preference which 3 or 4 destinations seem the most preferable?
- The shortlist is 3 or 4 depending on how many students you have (with very large groups, you could keep all 6). Having agreed on a shortlist, allocate a destination to each group of 2 or 3 learners e.g. group A has Kyoto, group B has Lake Bled, group C has Kilimanjaro etc.
- Draw attention to the next task, on frame 4: they should now research their destinations against the given criteria (accommodation, ease of travel, attractions, food / drink, cost). Within groups, if you prefer, different criteria can be allocated to different students. Brainstorm sites they can use: Wikipedia, Rough Guides, TripAdvisor, etc. Edit: Neil Mc just recommended kayak.co.uk as a good single source. This can be done as homework if it is more manageable, but I don’t personally have an issue with 15-20 minutes of research in class, with me as the teacher moving between BORs checking in and troubleshooting. Further edit: hot off the press Neil Mc has shared a worksheet he made for his students when he has a go with this task this week – find it directly below the procedure. The level of detail and scaffolding needed on a worksheet will vary depending on how successfully you think your students will be able to research the area. But this is a very useful example.
- Once the groups have prepared, move back to the main room and allow them to take turns to present their more concrete findings – they should listen and vote on their preferred destinations (either choosing the top one, top two or ranking all of them). This can be done as a jigsaw too if you have time – AAA (Kyoto), BBB (Lake Bled) CCC (Kilimanjaro) becoming ABC, ABC, ABC, before moving back to groups to agree.
- Homework: plan an itinerary for a 7-day, 2-week etc. holiday at their chosen destination.
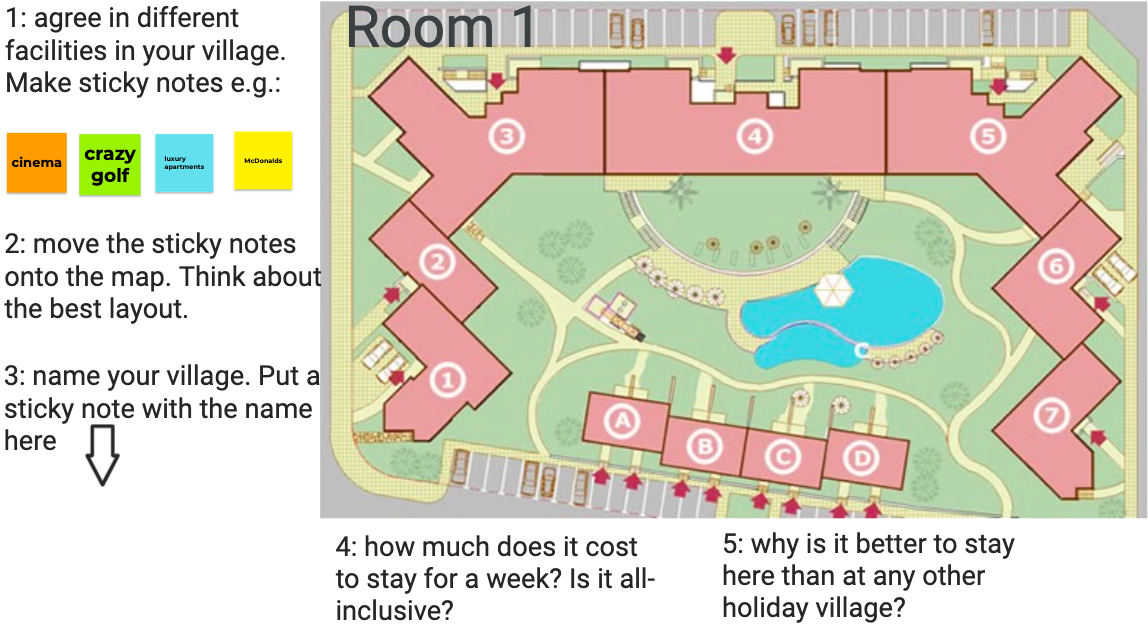
3. Zootopia / Holiday Village

(frames 5 / 6)
This is a version of an old classic. Jamboard works really well for this as a synchronous problem-soving / creative task in which learners need to create a zoo, placing the animals to maximise their well-being (I know, zoos and animal well-being…). My experience is that the Zoo format works better with learners younger than teens, so I have added an alternative where students create an ideal holiday village, filling it with the facilities they desire.
- Duplicate frames for however many groups / BORs you will have e.g. if you have 12 learners, and want them to work in groups of 3, then make 4 copies of frame 5. Label them Room 1, Room 2 etc.
- The stages of the task are indicated on the Jamboard frame above: 1) students first brainstorm 15-20 animals they might or would like to find in a zoo (feel free to let students pick extinct or fantasy animals if this motivates them further). They can then imagine the relationships between the animals – which would live near each other with no problem? Which should be put in different parts of the zoo and why?
- 2) Draw attention to the zoo plan: this is their zoo, and they should name it. They will present and compare their zoos later.
- 3) They should then decide which animals should go where, and why, moving (and possibly re-sizing) the sticky notes onto the relevant part of the plan. The criteria for placement: a) the happiness of the animals b) making the zoo exciting.
- For early finishers, ask them to respond to bonus task 4) – adding other facilities e.g. a petting zoo area, a cinema, a cafe, a playground etc.
- Ask students to then talk through their zoo, explaining their choices. The task for the listeners could be to choose their favourite zoo or could be to offer helpful further advice on its layout. As a non-competitive sort, I prefer the latter but judge based on your students.
- What about Holiday Village? Well, it’s very similar – see below. I’ve added extra prompts to indicate how you might make the task more challenging:

- This task format is very flexible – it could be about planning a new village or town, a layout for offices, the ideal flat or house etc. All it requires is a) finding a top-down plan and then using it as the background or a enlarged image for the frame b) adding some steps / instructions to the frame.
4. Lord of the Flies

(frame 7)
Another classic, and another task that is flexible: the desert island survival task, which works very well with brainstorming on Jamboard. Students in rooms brainstorm 8-12 items they would take to help them survive on a desert island. They agree in their group and then argue, whittle down etc. with the other groups.
- Tell students they are on a cruise and the ship starts sinking: they need to abandon it and head to a nearby desert island. They have time first, though, to gather some useful items before they get on board the lifeboats.
- On their own, they should brainstorm 8-12 items they can imagine finding anywhere on a large ship and should put them in their suitcase. These should help them find food, shelter, offer protection (against e.g. the elements or wild animals ) as well as entertain themselves.
- Put them in BORs, Room 1 and Room 2; in this version share the same frame while working in different rooms, but you can give them separate frames if you prefer. They should now agree on 8 items that are most useful to put in their lifeboat. In the image above, the students are in their own rooms in the process of agreeing on the best 8. Room 2 still need to get rid of an item. As students do this, move between the rooms and help them with language e.g. axe, fishing rod, tinned food were some of the items I needed to feed in / recast for the learners as they did the task.
- The next stage: one of the lifeboats is damaged and they need to get to shore in the same boat. But with the extra people in the boat they can now only take 5 items with them in total – so they need to whittle down from around 16 to 5, and they all need to agree. These are the items in the end they will take with them to the island.
- Follow-up / homework: report back one month later from life on the island. How useful have the items been? To what use did they put them?
5. Picture Story: The Big Leak

(frame 8)
I included this in my talk for a couple of reasons a) to show that tasks can be based around receptive skills and input-oriented, as well as being productive b) to show how tasks can work in exam classes. Here, the picture story is taken from Euroexam B1 Speaking. Rachel Tsateri has a wonderful post on jumbled picture stories from last November here.
- Before the lesson, check the pictures and put them in an order you feel is logical. Here, the first picture in each row is correct but the rest have been entirely jumbled (to lower challenge, you could just mix the pics up within rather than across the three rows). Then record yourself telling the story in a natural way, starting with the line Jim was fast asleep when the alarm rang at six in the morning. You can use this later.
- Duplicate frames for each BOR and then ask the students in rooms to agree on an order for the pictures. This is mostly meant to orient the students to the pictures and to allow you to feed in any necessary lexis as you monitor in rooms.
- Then bring the students together and tell your / the original version. Students should listen and order the pictures as they listen. Check they have done so correctly.
- Put them in groups and ask them to re-tell the story.
- If you have transcribed your version, give them the transcript now and ask learners to notice a) the tenses you used b) collocations to describe the actions or visuals c) linking words d) adjectives and adverbs to describe the events and feelings of the characters.

Thanks for these ideas! Also thanks for the link on Twitter to your online controlled oral exercises. I used some of the principles in my class yesterday. The task was to describe a picture of a classroom and to discuss questions related to classrooms. I had four different levels within one group, so I used the same pictures but graded the tasks and added more questions for the more advanced students. Everyone enjoyed it:) Cheers Kamila
LikeLiked by 1 person
My pleasure Kamila. The lesson sounds great, glad they all enjoyed it 🙂
LikeLiked by 1 person
Pingback: Taking Task-Based Learning Online – Fluency First ELT
Pingback: Questions about teaching Teens (aged 12-19) (useful links!)
Reblogged this on More than Teaching.
LikeLike